“Have you learned how to make trading cards using NanDeck yet?” He asked.
You can read the story below about how I first heard of NanDeck from my wow tcg teammate.
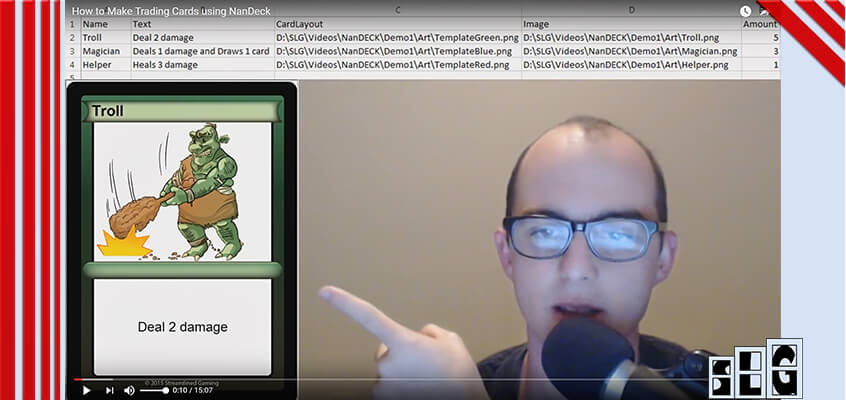
But first I want to show you this video I made where I show you how to make cards for your games. If you like the video and want to start making your own cards then you can download NanDeck here. It’s free.
And you can also get all of the art, excel sheet and NanDeck code here to follow along. It’s free. Just tell us where to send it.
Want free art to follow along with the video above? Get your free card art templates, character images and the NanDeck code here. Or click the image below and tell us where to send it.
(Want to watch more Nandeck videos? See how to add mana cost icons to your cards and more here with videos 2-4)
Also, below is a video of me using NanDeck to make a much less polished prototype of my latest game, Memaw’s Monsters:
From Playing TCG’s to Learning How to Make Trading Cards using NanDeck
Ryan was one of my teammates back when I played the WoW tcg before it became Hearthstone.
After so many years of playing TCGs, we both became interested in how to make a trading card game.
I was so excited to make my own game that my first prototypes were made out of notecards and a pen I found nearby.
My next prototypes were created using Microsoft Word.
Now my custom trading cards looked better but it took me forever to make each card.
I had a lot of problems using Microsoft Word to make my cards.
The biggest problem was having to reformat the cards every time I needed to edit them. Which was a lot since I was balancing my game.
Microsoft Word isn’t designed for making cards for games and it didn’t even save me much time.
Using Microsoft Word took much longer than I thought to set up and there aren’t many tutorials that helped me.
And when I explained my card making processes to Ryan, he looked at me with a bit of confusion.
After he explained his confusion, we quickly agreed on two things:
- Most people don’t want to play a game that looks like an elementary school project.
- I needed to learn how to create my trading cards quicker and more efficiently.
At this point of the conversation was when Ryan asked “Have you learned how to make trading cards using NanDeck yet?”
I didn’t know what NanDeck was at the time. Was I supposed to?
He explained to me how you can set up an Excel spreadsheet and import it into a free software called NanDeck.
This sounded great to me, but if it was so good why hadn’t I heard of it? I wondered how difficult it was to use.
“If you know how to code it shouldn’t be hard to figure out.” He said before I even asked.
Hahahaha!
I had no idea how to code anything at the time.
It was nice of Ryan to assume I knew how to code based on what he knew about me, but I had to confess and tell him I knew nothing.
Though I was determined to make my game and decided to download NanDeck and see how to use it.
Unfortunately back in 2012 there was very little information and few guides on how to use Nandeck.
I was discouraged and quickly gave up on the project and went back to using Microsoft Word.
But I remained curious about how to use NanDeck.
I’m sure Ryan would have loved to help me learn NanDeck but it just wasn’t time efficient for us back then considering I didn’t know anything about coding.
(Related: See where to find artwork to use when prototyping your games)
Now you don’t need to know how to code to use NanDeck
As time went by I ended up getting a job at an insurance company where I got the opportunity to learn to code.
After I understood the basics of coding I tried out NanDeck again.
I was finally able to figure out how to make cards using NanDeck.
Looking back on it, I was using Nandeck in a very inefficient way and it was still difficult. But I felt better knowing I had started on the right path.
Fast forward another couple of years and literally 100s of hours of practice, and you get what I showed you in the video above.
I know much more than what I have covered in this video but the method is mostly the same.
The best part about how to make trading cards using NanDeck now is that you don’t have to know how to code (this wasn’t always the case).
Recently, Andrea, the creator of NanDeck, added the Visual Editor (as seen in the video above).
This makes it much easier for game designers that don’t know how to code.
There was much more coding knowledge required before the Visual Editor.
And also you now have access to the code we provide.
I want to teach you how to use Nandeck (and save you time)
My goal was to not only learn how to make cards for myself but to teach other creative and curious people like me how they can too.
I love helping others. On my own journey, I learned it is hard to find quality information about making efficient and professional looking card prototypes without having to spend hundreds of dollars on software with a high learning curve such as Adobe Indesign.
So once I developed my method I started showing others.
My first attempt was a massive failure.
I used a series of emails appropriately titled, “How to Make Trading Cards Using NanDeck”. I used all text to convey the method.
No one wanted to read that! (and I don’t blame them). I learned that way, but it wasn’t fun and it’s not my preferred method.
I was avoiding being on camera.
Talking to a computer and hearing my own voice when I edit videos makes me feel weird.
But I kept other creative people like you in mind when motivating myself to make this video over the last several weeks.
I thought about “How would I have wanted to learn NanDeck back in 2012?”
And the answer was “through video tutorials!”
What do You want to Know about NanDeck?
So there you have it.
That’s how I learned how to make trading cards using NanDeck.
I plan on making many more videos and am still very new to this video tutorial world.
If you have any questions, feedback or words of encouragement after watching the video above, please let me know in the comments below.
My goal is to help you save time while making professional looking cards for your games.
And if you know anyone that could benefit from this video, then feel free to share it with them as well.
Your friendship might even improve like when I became better friends with my brother after we started making and testing games together!
Related Articles:
How I Print my Card Prototypes at Home
5 Attributes of a Great Game
3 Reasons You Should Make a Game
Isaac Shalev
Good video! You can use the Unit=Inch directive to use inches instead of cm, and if you set your page to 8.5×11 (rather than A4, which is the default) by using the Page directive, you’ll be able to print 2.5×3.5 cards 9-up w/o zoom.
Calvin Keeney
Wow. Thanks so much Isaac!
I know my way of making the cards isn’t perfect so I am glad I have people like you that help me out.
You are appreciated and I will remember this going forward (and hopefully make a video to explain this as well.)
I Spent $550 on Board Game Artwork and This is What I Got - Streamlined Gaming
[…] (Related: See how to make efficient and good looking board game prototypes using this free software) […]
código de indicac~ao da binance
Thanks for sharing. I read many of your blog posts, cool, your blog is very good. https://accounts.binance.com/pt-BR/register-person?ref=PORL8W0Z
registrace na binance
Your point of view caught my eye and was very interesting. Thanks. I have a question for you. https://www.binance.info/cs/join?ref=W0BCQMF1
binance
Can you be more specific about the content of your article? After reading it, I still have some doubts. Hope you can help me.
Melden Sie sich an, um 100 USDT zu erhalten
Your point of view caught my eye and was very interesting. Thanks. I have a question for you.
sex
Thank you very much for sharing, I learned a lot from your article. Very cool. Thanks.
註冊即可獲得100 USDT
Your point of view caught my eye and was very interesting. Thanks. I have a question for you. https://www.binance.com/fr-AF/register?ref=JHQQKNKN
15 Great Board Games Like Password and Other Famous TV Gameshows - Streamlined Gaming
[…] 11 Popular Board Game Pieces 14 Witty Deduction Board Games for You to Play How to Make Your Own Card Game […]
12 Useful Board Game Pieces for Making Your Own Tabletop Game - Streamlined Gaming
[…] Learn efficient software like NanDeck to make cards […]
binance
Thanks for sharing. I read many of your blog posts, cool, your blog is very good.
The Ultimate Beginner’s Guide to Designing Your First Board Game - Streamlined Gaming
[…] Keep it low-tech for now. We’re building a testable version, not a retail-ready copy. And if you need help choosing which pieces to include, this guide will help: […]
binance
Your article helped me a lot, is there any more related content? Thanks!
binance Registrera
Your article helped me a lot, is there any more related content? Thanks!