I have seen and tried many different ways to print card games at home. But I want to show you the way I like best.
There are a lot of creative people out there that started making card games with notecards and a pen. I know that is how I started.
But as I went through years and years of trial and error. I found better tools to use to print out my own card games.
My method also works well for printing other people’s Print & Play games to playtest.
While there are many other methods out there to print your own playing cards. This is the method I have found to be most efficient while still looking and feeling professional.
And just so you know. Here is a way that Nick Hayes has shared with the community that is supposed to be even more professional than my method.
But I still prefer my method in general for the card game prototypes I make. Though once you are 95% done with balancing your game, I would recommend getting it professionally printed from one of these companies.
Mainly because I make so many balance changes to my games that I am constantly printing and cutting out the new cards.
Now onto the method. We must first…
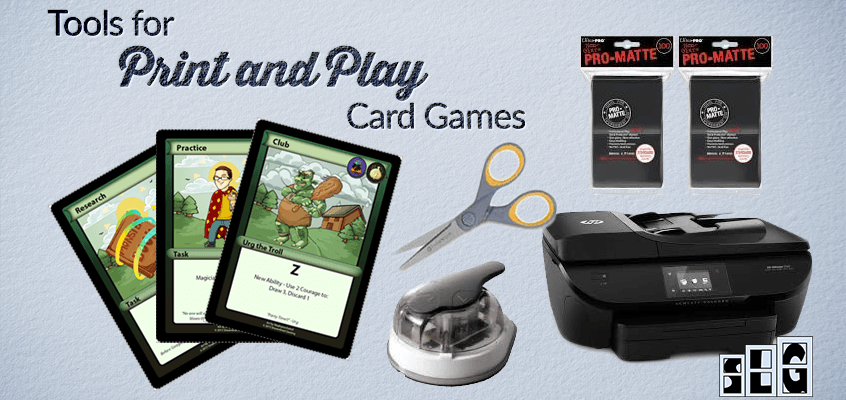
1. Get a Printer – I Use an InkJet when Printing My Cards at Home

My Experience:
I have personally used the HP InkJet 5740 Printer for almost all of my card printing. It has worked great.
I don’t know too much about which printers are the most cost efficient but this one seemed pretty good. The box of ink that I buy says it can print about 165 pages of color colored cards. Or 200 pages of plain black and white. However, my cards were very detailed (see image for this post) and took a lot more ink to print. So I probably only got about 125 pages per cartridge.
But that is still way better than having to print them at a local print shop like Office Depot. Something my friend sometimes has to do in a bind at a convention.
Though I do recommend using a local printer if you only want to print out a few pages of cards.
(Related – Ever thought about making a board game? Get the answers to many questions new board game designers have here.)
2. Print Your Cards at Home on Thick Card Stock

My Experience:
Once I found thick cardstock like this, I never used regular printing paper again.
I used to use the basic “multi purpose” paper that is cheap. But it’s too thin. The ink bleeds right through and you can’t really shuffle the cards.
Your cards will feel much more like actual playing cards with thick card stock. And the ink won’t show through. Well, to be honest I could still see through them a little if I held them up to a light. But in general, I couldn’t see through them at all. This method is also much more effective at getting playtesters than my old fashioned “write on notecards” technique.
The prototypes that I have made that felt the closest to “real playing cards” used this type of card stock and were placed in sleeves (see below).
Less expensive option for game designers that have extra cards laying around:
People have also found it useful to print on thin paper like this and put their cards in front of old trading cards. If you have some old cards that you don’t use anymore, then you can sleeve them up (see step #5). And then place your thin paper cards in front of them.
Pros – This cheaper method is good because the cards will still shuffle well in the sleeves and they cost less.
Cons – The cards look worse when there is an old Magic the Gathering card behind them and the paper is seethrough.
My thoughts – Use the less expensive method for early on prototyping. Then once your game is 80-90% complete and you are making less balance changes, start printing with the thicker cardstock. It will look better and be more attractive to publishers and playtesters.
3. Cut out the Cards that You Print at Home

My Experience:
I actually use scissors like this right now. But every time I am in the middle of cutting out my cards, I think “I REALLY need to get a paper cutter.”
And then I finish cutting the cards and forget about it until a couple of weeks go by and I am cutting out more cards. Or when I am writing an article about it. *I really do need to get one of these paper cutters…*
I have seen other people post about how much they like their paper cutter. And how much time their paper cutter saves them.
So if you like printing out a lot of cards, then I think you would really thank yourself if you got one of these. There are many to choose from, but I linked this one because it is the one I want to buy next.
(Related Reading: Introduce a family or friend to these fun and easy to learn board games.)
A Rotatrim Cutter – An Expensive but More Precise Alternative to a Guillotine Cutter

This Rotatrim cutter is a top of the line manual paper cutter/trimmer. These are very expensive and you probably wouldn’t need these for prototyping. But if you find yourself cutting out a lot of items and need it to be precise, then this is the best there is.
Photographers working in a dark room used these for extra precise cuts. I remember using one of these in my college Photography classes. It was really nice but I never realized how expensive they were!
My take on the Rotatrim – I would still personally just get the guillotine cutter for my prototyping projects. But I could see a day where I invest in a Rotatrim like this. If I had some big projects that required precision or if I had a child and I wanted them to be safer working on projects with me.
(Related – Almost everything you need to know about making a professional looking prototype)
4. Trim Your Cards with a Corner Cutter Like This

Update!
If you choose to go with the electrical card cutter above, then you don’t need to use a corner cutter like this. However, this corner cutter still saves a lot of time for those of us that cut out cards manually.
My Experience:
I could have put this step in with the “cut out the cards” step. But I wanted this part to stand out because I think the cards look and feel much better when the corners have been cut.
When I first started printing my own card games. I would cut out my cards and start shuffling them. But something seemed off…
Then one day I was looking through some old WoW (World of Warcraft) tcg cards. And I noticed that they had rounded corners.
“Oh yeah!” I thought.
I immediately purchased a corner cutter and have enjoyed the feel of the cards much more since.
**Note – The corner cutter I have listed here is the one I would buy if I was shopping for one now. The one I have been using is this one. It is a good one but there have been times where I wished I could adjust the size of the cut. So I would rather get the adjustable one shown in the picture (or link below).
(Also Read – Craft the perfect pitch to entice playtesters to test out your prototype)
5. Sleeve Your Cards so They Shuffle Easier

My Experience:
And the last thing I do is sleeve the cards with these matte card protectors.
I love the feel of sleeved cards. And with the thickness of the card stock, the cards actually feel close to that of a standard sleeved card.
Also, the ink will rub off onto your fingers while shuffling the cards using this method if you don’t sleeve them. This is another reason I like them sleeved.
Adhesive Alternative – For those that don’t like sleeves
I have also seen people spray their cards after printing them (step 2 of this process).
The typical spray that is used to coat the cards is Acrylic Adhesive spray.
I wouldn’t want to personally do this but I wanted you to know what others have found to work. My preference is to simply sleeve the cards.
**Note – I use the Matte card sleeves for my prototypes. They have a somewhat dull look to the front of them. I like this because it blocks glare on the cards.
But feel free to use whichever card sleeves you want. Just be sure to get the right size.
The “standard size” sleeves that fit Magic the Gathering (MtG) cards are almost always the size you will want. Especially if you are printing standard “poker sized” cards (which are 2.5 in X 3.5 in.)
(Related: You might also like reading our interview with a board game manufacturer)
Bonus step: Laminate Your Homemade Cards

My Experience:
I haven’t laminated any of my cards but several other game designers have recommended it to me. This is what one person highly recommended if you want to laminate your prototype. He specifically used it to laminate player mats because they didn’t get reprinted often.
Laminating the cards seems like it would work best with:
- Cards that you don’t plan to have to reprint much such as score trackers and player mats and
- Cards that don’t need to be shuffled
If you are needing to shuffle your cards, then I still would recommend using card sleeves as seen above.
(See also – 5 ways to make your prototype more entertaining and fun)
Your Thoughts on Printing Cards for Board Games at Home?
How do you print card games at home?
Let’s all work together and find what ways work best. Please share your thoughts in the comments section below so others can learn from you. I look forward to seeing what you have found useful in making your cards at home as well.
(Related – Ever thought about making a board game? Get the answers to many questions new board game designers have here.)
21 Responses
Charlotte Pisors
I never knew there was such a thing as a corner cutter. Pretty neat idea. I can see where that would make a difference.
Calvin Keeney
I really like the corner cutter. Especially since I am sloppy with scissors. This made my cards not fit into the sleeves without cutting the corners.
Chris
I either go for the quick and dirty with paper cards inserted into sleeves over Magic Lands or other disposable cards or I go for the full monty and pay a print-on-demand service to make my cards. I don’t spend a lot of time in the middle ground when I design, but these methods seem the nicest for easily making cards at home!
Calvin Keeney
Thanks Chris! I started a lot of my prototypes out like that too (sleeves over tcg cards). It works really well for the small time investment.
You inspired me to get my next (almost) fully tested card game done by a print-on-demand service.
I really liked the way your game looked. I thought your prototype of Shootout! was a finished product when you demoed it for me.
Santiago Rengifo Ruiz
What do you think about laminating the cards? I feel them better, but it’s 2x work.
Calvin Keeney
I haven’t tried laminating any of my cards. I really like having the card protectors and I think the cards feel good in them.
My prototypes also change a lot so I personally wouldn’t want to have to keep laminating my cards. However, if you are really happy with where your card game is, then it seems like it could be nice to laminate them.
Have you tried putting your cards in the card protector sleeves yet? If so, what did you think of them?
Calvin Keeney
I also had someone mention to me that they use a laminator on items that don’t need to be shuffled (player mats and reference cards). A laminator seems like it would be good to help protect items like this. Though I would personally still not do it unless I knew the player mats/ref cards weren’t going to need to be updated often.
Thanks for the suggestion on the laminator, Santiago, I may try this on some of my future prototype pieces
Jimmy Kersey
I also use a ink jet printer. Epson ecotank. You just refill ink with bottles instead of buying expensive cartridges. I also give my cards, before I cut, a light coat of clear spray poly. It makes the colors pop more and gives them a protective coating.
Calvin Keeney
This is awesome and helpful info Jimmy. Thanks for sharing. Everytime I walk by one of those refillable tank printers at the store, I contemplate how well they work. It’s nice hearing that they are working for you. That gives me a bit more of a reason to consider investing in one myself.
I’m just starting to focus more and more on prototyping so now might be a good time for me to try it out myself 🙂
Lorie Beshara
What if you use blank playing cards (not plastic coated) what kind of printer would you use as they are so small?
Calvin Keeney
I’m guessing you are talking about single 2.5 in by 3.5 in cards? I’m not really sure of a printer that works well for those that I can think of.
The blank playing cards are normally used to write and draw on by hand. You might be able to tape them to a piece of paper somehow (9 to a page) and setup your printer in a way to print on them laid out that way. That is a lot of work and susceptible to errors though.
I wish I knew a better answer for you Lorie! If you find a way to make this work better, please let me know so I will know about it too and can add it to appropriate posts.
Why play Duel Masters? – The Fiona Woods
[…] However, I will note that there are plenty of resources online that can offer guidance in the manufacture of your own trading cards – […]
Which Paper Is Used For Making Playing Cards? – Fallsgardencafe
[…] via […]
how can i print my own game cards - dataslist
[…] [DIY] How to Print Card Games From Your Own Home … […]
gate io
Your article helped me a lot, thanks for the information. I also like your blog theme, can you tell me how you did it?
gate io
Reading your article helped me a lot, but I still had some doubts at the time, could I ask you for advice? Thanks.
To tài khon min phí
Thank you for your sharing. I am worried that I lack creative ideas. It is your article that makes me full of hope. Thank you. But, I have a question, can you help me? https://accounts.binance.com/vi/register?ref=DB40ITMB
b^onus de indicac~ao da binance
Thank you for your sharing. I am worried that I lack creative ideas. It is your article that makes me full of hope. Thank you. But, I have a question, can you help me? https://www.binance.info/pt-BR/join?ref=S5H7X3LP
Kod Binance
I don’t think the title of your article matches the content lol. Just kidding, mainly because I had some doubts after reading the article.
Регистрация
Your point of view caught my eye and was very interesting. Thanks. I have a question for you.
^Inscrieti-va pentru a obtine 100 USDT
Thanks for sharing. I read many of your blog posts, cool, your blog is very good.